How to Build Wall Shelves: A Simple DIY Project for Beginners
Building your own wall shelf is one of the easiest ways to get started with woodworking. You don't need complicated joinery, expensive tools, or a large workshop. For this project, you'll make a simple wooden shelf supported by two metal brackets.
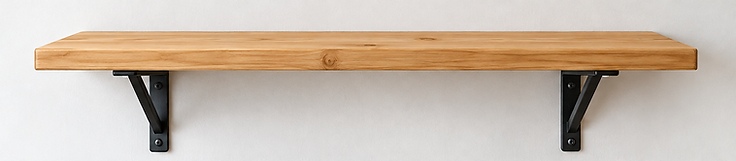
Illustrative image — this design has not been physically built or load-tested.
On this page
Our beginner-friendly design uses one 24-inch-long board, two matching brackets, and basic tools. It's suitable for displaying lightweight decorations, small plants, or other everyday items, provided the complete installation is rated for the intended load.
This tutorial covers the measurements, materials, preparation, and installation steps. You'll also find a printable construction plan.
Quick Project Overview
Materials
You'll need:
- One solid-wood board or project panel, finished to 24" × 8" × ¾"
- Two matching metal shelf brackets suitable for an 8-inch-deep shelf
- Structural mounting screws specified by the bracket manufacturer for wood-stud installation
- Compatible short screws for attaching the shelf to the brackets, if required
- Sandpaper, such as 120-, 150-, and 180-grit
- Optional wood finish or paint
Choosing the Right Board
Pine is an affordable choice for a first woodworking project. Poplar is another good option, particularly if you plan to paint the shelf.
Pay attention to the actual board dimensions. A lumberyard board labeled 1×8 is typically about ¾ inch thick and 7¼ inches wide, not a full 8 inches.
For the exact dimensions in this plan, purchase an actual 8-inch-wide project panel or cut a wider board to size. If you prefer to use a standard 1×8, measure its width and revise the project depth accordingly.
Avoid severely warped boards, large loose knots, or visible damage.
Tools
You'll need:
- Tape measure
- Combination or speed square
- Pencil
- Level
- Stud finder and a reliable method of confirming stud locations
- Drill/driver and appropriate drill bits
- Sanding block or orbital sander
- Safety glasses
- Saw, unless the board is already cut to length
Many home improvement stores can cut a board to length, although you should verify the finished measurements yourself.
Shelf Dimensions and Bracket Placement
Our simple DIY wall shelf measures:
- Width: 24 inches
- Depth: 8 inches
- Thickness: ¾ inch
The two bracket centerlines are positioned 4 inches from either end of the shelf. That creates 16 inches between bracket centerlines, matching the nominal spacing of many residential wall studs.
These are layout dimensions, not universal mounting-hole measurements. Actual bracket hole locations depend on the hardware you purchase.
Choose brackets with horizontal support arms appropriate for the shelf depth. Follow the bracket manufacturer's instructions for mounting orientation, fasteners, and support requirements.
If your wall studs are not positioned to match the design, do not force the layout. Adapt the shelf design or choose a suitable location.
Step-by-Step Instructions
Step 1: Measure and Cut the Shelf Board
Measure the board and mark a length of 24 inches.
Use a square to draw a straight cutting line across the board. Cut carefully with a suitable saw, following the tool manufacturer's safety instructions.
If your board was precut, check that both ends are square and that the dimensions match the plan.
For more help with accurate layout, see our guide to How to Measure and Mark Wood.
Step 2: Sand the Wood
Start with an appropriate sandpaper grit for the board's condition. For a relatively smooth board, 120-grit is a reasonable starting point.
Sand the faces, edges, and ends. Progress through finer grits as appropriate for your selected finish.
Lightly soften sharp edges and corners so the shelf feels comfortable to handle.
Remove the sanding dust thoroughly before finishing.
Our How to Sand Wood guide explains sanding techniques and grit selection in greater detail.
Step 3: Apply a Finish
You can leave the shelf unfinished for a temporary workshop demonstration, but an appropriate finish generally makes it easier to clean and helps protect the wood.
For a natural appearance, consider a compatible clear water-based finish. Paint is another straightforward option.
Apply the product according to its manufacturer's instructions, including ventilation, surface preparation, recoat intervals, and curing requirements.
Allow sufficient drying or curing before handling or installing the shelf.
See Wood Finishing Basics for help choosing a finish.
Step 4: Locate the Wall Studs
This is the most important installation step.
Use a stud finder to identify two suitable structural wood studs. Verify their positions and confirm that their spacing matches the planned bracket layout.
Do not assume every wall uses 16-inch stud spacing. Also consider the possibility of electrical wiring, plumbing, or other hidden services before drilling.
If you're uncertain about the wall construction or what is behind the drywall, consult a qualified professional.
Step 5: Install the Shelf Brackets
Mark the desired shelf height and use a level to establish a horizontal reference line.
Position the two brackets at the verified stud centerlines. Check that both brackets are oriented correctly and will support the shelf at the same height.
Mark the wall-mounting holes using the actual brackets as templates.
Drill pilot holes and install the mounting fasteners according to the bracket manufacturer's requirements. Screw diameter, length, pilot-hole size, and required embedment depend on the hardware and wall structure.
After installation, confirm that both brackets are level, properly secured, and free of movement.
Step 6: Attach the Wooden Shelf
Place the finished board on the brackets.
Center it so the bracket centerlines are approximately 4 inches from each end, assuming the verified 16-inch stud layout.
Check that the shelf is level and fully supported by both brackets.
If your brackets include holes for securing the wood, attach the board from underneath using compatible screws. Select screw lengths carefully so the tips cannot penetrate the top of the ¾-inch board.
Do not assume that screws supplied with a bracket are suitable for every shelf thickness.
Step 7: Inspect the Finished Installation
Before placing anything on the shelf, check that:
- Both brackets are securely attached to structural studs.
- The shelf is level and properly supported.
- The board is secured to the brackets as required.
- No screws protrude through the wood.
- The assembly does not wobble or shift.
There is no universal weight rating for this project. Capacity depends on the specific brackets, fasteners, wood, studs, wall condition, and installation. Follow the hardware manufacturer's requirements and never exceed the safe capacity of the complete assembly.
Avoid heavy, overhead, or safety-critical storage.
Common Beginner Mistakes
Buying a Nominal 1×8 and Expecting an 8-Inch Depth
Always check actual lumber dimensions.
Installing Brackets Without Verifying Studs
Stud locations determine whether the proposed mounting arrangement will work.
Using Whatever Screws Are Available
Wall-mounting fasteners must suit the brackets and structural substrate. Shelf-attachment screws must also suit the wood thickness.
Skipping the Level
Even small differences between bracket heights can leave the shelf uneven.
Loading the Shelf Before Checking the Installation
Inspect the entire assembly first and respect the verified hardware and structural limits.
Simple Wall Shelf Plan V1.1
The Simple Wall Shelf V1.1 construction plan includes a dimensioned layout, cut list, material requirements, and installation sequence.
The plan is supplementary: the dimensions, materials, and installation sequence it contains are also given in text on this page.
Editorial note: The current plan is a technical draft pending verification of the selected bracket hardware. Do not present it as a physically tested or certified design.
Frequently Asked Questions
Can a beginner build a wall shelf?
Yes. A basic bracket-supported shelf is a manageable beginner project because it requires only one wooden component. Accurate measuring and safe wall installation are the most important skills.
Can I make the shelf without a saw?
Yes, if you purchase a board or project panel already cut to the required dimensions. Check the measurements and square ends before installation.
Can I use a 1×8 board?
Yes, but a typical nominal 1×8 measures approximately 7¼ inches wide. The shelf will be shallower than the 8-inch design unless you use a wider panel.
Can I install the brackets using drywall anchors?
This particular plan specifies structural wood-stud mounting. A drywall-anchor installation would require a separately evaluated design and hardware suitable for that wall and load.
How much weight can the shelf hold?
There is no single safe weight limit for this design. The allowable load depends on the actual brackets, fasteners, wood, wall structure, and installation. Use the manufacturer's guidance for the complete assembly.
Final Thoughts
Learning how to build wall shelves doesn't have to start with a complicated floating-shelf project.
A well-measured wooden board, suitable brackets, and a carefully planned installation make an approachable first project. Once you've mastered this design, you can experiment with different finishes, shelf lengths, and more advanced woodworking techniques.
For your next project, explore our 25 Easy Woodworking Projects for Beginners collection.
Wood Project Lab provides educational project plans. This design has not been physically built or load-tested. Verify materials, hardware, wall conditions, and installation requirements before construction or use.