How to Build a Wooden Planter Box: Easy DIY Plans for Beginners
Learn how to build a planter box from cedar with simple square corners, predrilled screws, and a removable slatted bottom. This beginner plan includes exact dimensions, a full cut list, and a free printable PDF.
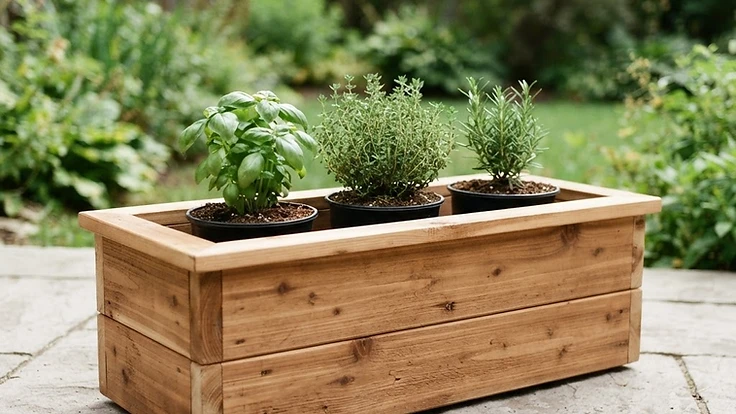
Design illustration — this planter has not been physically built or load-tested.
On this page
Introduction and Project Overview
If you have been wondering how to build a planter box, this is a good place to start. This DIY planter box is a small rectangular cedar enclosure with two stacked horizontal boards on every side, simple square corners, and no legs. It is designed to hold a few small removable nursery pots on a patio, balcony, or porch.
These wooden planter box plans cover the dimensions, materials, tools, cut list, and eight assembly steps, and you can download the free planter box plans as a printable PDF. It is a good project if you are new to woodworking; if you are still choosing a first build, browse our beginner woodworking projects.
Why Build a Wooden Planter Box?
A planter box is one of the most useful first outdoor projects. It uses straight cuts, flat boards, and simple screwed corners, so you can practice measuring, checking for square, and predrilling without learning complicated joinery.
This design is deliberately small. It is a low, rectangular cedar enclosure with no legs, built to hold a row of small nursery pots on a patio, balcony, or porch. Because the pots stay in their own containers, you can swap plants with the seasons, lift the slatted bottom out for cleaning, and avoid packing soil directly against the wood.
Cedar is a popular choice for outdoor projects because it is lightweight, easy to cut, and naturally suited to outdoor use. It still needs sensible care, which is covered later in this guide.
Wooden Planter Box Dimensions
These are the verified V1.3 dimensions for how to make a planter box of this size:
- Outside length: 24 inches
- Outside width: 10 inches (an 8½-inch end board plus two ¾-inch long-wall thicknesses)
- Outside height: 11 inches (two 5½-inch courses)
- Inside length: 22½ inches (24 inches minus two ¾-inch end boards)
- Inside width: 8½ inches
- Bottom slat length: 8¼ inches — approximately ⅛-inch clearance at each end
- Bottom support cleat top: 1½ inches above the planter’s bottom edge
- Bottom slat top: 2¼ inches above the planter’s bottom edge
The wall boards are two courses of nominal 1×6 stock. A 1×6 is not actually 6 inches wide or 1 inch thick; this plan assumes an actual size of 5½ inches wide and ¾ inch thick, and the same actual-size logic applies to the 1×3 and 1×2 parts. If your lumber measures differently, stop and re-check every dependent measurement before you cut.
The bottom is made from eight slats with seven ¼-inch gaps between them and a ⅜-inch clearance at each end: eight 2½-inch slats (20 inches), plus seven ¼-inch gaps (1¾ inches), plus two ⅜-inch end gaps (¾ inch) equals the 22½-inch inside length.
If measuring and marking is new to you, our guide to how to measure and mark wood covers the basics.
Materials Needed
- Two nominal 1×6 × 8-foot cedar boards (wall boards)
- One nominal 1×3 × 8-foot cedar board (bottom slats)
- One nominal 1×2 × 8-foot cedar board (cleats and battens)
- Cedar-compatible, corrosion-resistant fasteners (stainless steel exterior screws suited to cedar)
- Sandpaper
- Optional exterior wood finish suitable for cedar
These board quantities are theoretical minimums and assume straight, sound lumber with no defects at cut lines or fastening points. Buy extra stock for splits, knots, warp, or cutting mistakes.
Actual lumber dimensions must be verified before cutting. Measure the real width and thickness of every board you bring home.
New to buying boards? Read woodworking lumber basics to understand nominal versus actual sizes.
Hardware Schedule
| Use | Qty | Screw |
|---|---|---|
| Wall-corner screws | 16 | #8 × 1¾ in. stainless exterior screws |
| End-batten screws | 8 | #8 × 1¼ in. stainless exterior screws |
| Cleat screws | 10 | #8 × 1¼ in. stainless exterior screws |
No screws are used for the bottom slats. Pilot-hole sizing and edge distances should follow the fastener manufacturer’s guidance, and extra screws are worth buying.
Tools You’ll Need
- Tape measure
- Pencil and a combination or speed square
- Hand saw, miter saw, or circular saw, depending on what you have
- Drill/driver with drill bits for predrilling
- Clamps (helpful for holding corners while you predrill)
- Sandpaper or a sanding block
- Safety glasses and hearing protection when using power tools
Wear eye protection whenever you cut, drill, or sand, and use hearing and dust protection as appropriate for the tools you choose. Our guide to beginner woodworking tools can help you decide what to buy or borrow.
Complete Wooden Planter Box Cut List
Use these exact V1.3 dimensions. Lengths are listed first, then width and thickness.
| Component | Qty | Dimensions (L × W × T) | Nominal stock |
|---|---|---|---|
| Long wall boards | 4 | 24" × 5½" × ¾" | 1×6 |
| Short end boards | 4 | 8½" × 5½" × ¾" | 1×6 |
| Bottom support cleats | 2 | 22½" × 1½" × ¾" | 1×2 |
| Interior end battens | 2 | 8" × 1½" × ¾" | 1×2 |
| Crosswise bottom slats | 8 | 8¼" × 2½" × ¾" | 1×3 |
Label the upper and lower wall boards as you cut them and sand the cut edges lightly. Keep any boards with splits or knots out of the areas where screws will go.
The eight bottom slats are cut to 8¼ inches, which leaves approximately ⅛-inch clearance at each end of the 8½-inch inside width so they drop in and lift out freely. The 8½-inch dimension in this list belongs to the short end boards, not the slats.
Not sure how to read a cut list? See how to read a woodworking cut list.
How to Build a Wooden Planter Box: Step by Step
Follow these eight steps in order. Predrill every screw hole and check for square as you go.
Step 1: Measure and Cut
Inspect every board for splits, loose knots at fastening points, and warp. Verify the actual board sizes against the dimensions in the cut list, then cut all components to the approved V1.3 lengths. Label the upper and lower wall boards and sand the cut edges.
Step 2: Assemble the Lower Frame
Fit the two 8½-inch end boards between two 24-inch long boards so the end boards sit flush with the ends of the long boards. Check the frame for square, then predrill and fasten each corner through the long board into the end board with two appropriately positioned #8 × 1¾-inch stainless exterior screws (eight screws for this course).
Step 3: Assemble the Upper Frame
Repeat the same process with the remaining four wall boards, using another eight corner screws. Align the upper frame directly above the lower frame so the horizontal seam sits at 5½ inches, and check that the overall height is 11 inches.
Step 4: Install Interior Battens
Use the two 8-inch vertical end battens to connect the upper and lower wall courses. Center each batten on the inside face of a short end wall, with its lower end 2½ inches above the planter’s bottom edge (its top ends ½ inch below the rim).
Predrill and fasten from the outside through the end wall into the batten, using two #8 × 1¼-inch stainless screws in the lower board and two in the upper board, eight in total. Keep these screws away from the corner screws and make sure no screw tips protrude.
Step 5: Install Support Cleats
Position a 22½-inch cleat along the inside of each lower long wall. The top surface of each cleat sits 1½ inches above the planter’s bottom edge, which puts its lower edge flush with the bottom.
Predrill and drive five #8 × 1¼-inch stainless screws per cleat from the outside through the lower wall into the cleat, spaced along its length. Check that the screw tips do not protrude.
Step 6: Fit the Bottom Slats
Before installing all eight bottom slats, dry-fit one slat between the long walls. The planned slat length is 8¼ inches, leaving approximately ⅛ inch of clearance at each end within the 8½-inch inside width. If actual lumber dimensions differ, measure the opening and adjust the slat lengths as needed before cutting the remaining pieces. Maintain adequate bearing on both support cleats.
Set the eight 8¼-inch slats across the 8½-inch inside width, resting on the two cleats, so each slat has approximately ⅛-inch clearance at each end. Starting at one short end, leave a ⅜-inch clearance, then alternate a 2½-inch slat and a ¼-inch gap, and finish with a ⅜-inch clearance at the other end. That gives seven ¼-inch gaps between slats.
Do not glue or fasten the slats. They are meant to lift out for cleaning.
Step 7: Sand and Finish
Ease sharp edges, remove splinters, and wipe off the dust. If you want a finish, choose a cedar-compatible exterior product and follow the manufacturer’s instructions.
For smoother surfaces, read how to sand wood and wood finishing basics.
Step 8: Position and Plant
Set the planter on a stable, level surface with drainage underneath. Use small removable nursery pots with drainage holes, distribute the weight evenly, and check the planter regularly for wobble, loose screws, or splitting.
Free Printable Wooden Planter Box Plans
The printable Version 1.3 plan is a three-page PDF. Page 1 gives the finished dimensions, the cut list, the lumber shopping list, hardware and tools, and the bottom slat spacing. Page 2 gives the eight assembly steps and a critical fit check. Page 3 covers the dimension audit, support and batten geometry, fastener positioning checks, and the safety and use limitations.
Version 1.3 revises the earlier V1.2 plan: the eight bottom slats are now 8¼ inches long, and assembly is shown as eight steps. The PDF is the dimensional reference for this project. If you ever find a difference between this web page and the PDF, follow the PDF and let us know.
Common Beginner Mistakes to Avoid
Using nominal sizes instead of actual sizes
A nominal 1×6 is not 6 inches wide. Measure your boards before cutting, because the whole design depends on 5½-inch-wide, ¾-inch-thick stock.
Skipping predrilling
Cedar can split near board ends and edges. Predrill every screw hole, and use fasteners made for cedar and outdoor use.
Not checking for square
Check each frame for square before fastening the corners. A twisted frame makes the cleats, battens, and slats harder to fit.
Letting screw tips protrude
Screws that come through the inside face can catch hands and pots. Use the screw lengths in the hardware schedule and check the inside of the planter.
Fastening the slats
The slats are intentionally loose so they can be removed for cleaning. Leave the ¼-inch gaps and ⅜-inch end clearances as drawn.
Treating the planter as a soil container
This design is for small removable nursery pots. Do not fill the wooden enclosure directly with soil, and do not use it as seating, a step, or a place for heavy loads.
How to Make a Wooden Planter Box Last Longer
Apply a cedar-compatible exterior finish if you want to slow weathering, and follow the product’s instructions for preparation and drying.
Keep the planter on a stable, level surface with drainage underneath so water does not collect against the wood. If you use a waterproof tray under individual nursery pots to protect your patio, make sure it does not trap water against the planter.
Lift the slatted bottom out occasionally to clear debris, and regularly check for wobble, splitting, loose fasteners, and deflection. Avoid lifting the planter while it is loaded.
Can You Customize These Wooden Planter Box Plans?
You can choose your own finish, pot style, or plant selection. Those changes do not affect the structure.
Changing the size is different. The cut list, cleat length, slat count, and spacing all depend on each other, so a new length or width means recalculating every part and re-checking the fit. We have only published V1.3 as drawn, and it has not been built or load-tested, so we do not offer a verified modified version.
If you substitute a different wood or different fasteners, verify the actual lumber dimensions, fastener suitability, and joint fit before you build.
Frequently Asked Questions
How big is this wooden planter box?
The finished planter is 24 inches long, 10 inches wide, and 11 inches high, with an inside opening of approximately 22½ by 8½ inches.
Can I fill the planter with soil?
No. The design is for small removable nursery pots with drainage holes. Do not fill the wooden enclosure directly with soil.
How much weight can it hold?
We have not published a load rating because the design has not been load-tested. Use only small, lightweight pots, avoid concentrated loads, and do not use it as seating or a step.
Why are the bottom slats not fastened?
They rest on the two cleats so you can lift them out for cleaning. The plan calls for ¼-inch gaps between slats and ⅜-inch clearances at both ends.
What wood should I use?
The plan is drawn for cedar. If you use another wood, verify the actual lumber dimensions and the fastener suitability before building.
How many boards do I need to buy?
Two nominal 1×6 × 8-foot boards, one nominal 1×3 × 8-foot board, and one nominal 1×2 × 8-foot board are the theoretical minimums for sound lumber. Buy extra for defects or mistakes.
Is the PDF plan free?
Yes. The Version 1.3 three-page PDF can be downloaded from this page at no cost.
More Beginner Woodworking Projects
Looking for your next build? Try the Simple Wall Shelf or the Simple Wooden Phone Stand, browse small woodworking projects, or see the full beginner woodworking projects collection.
Final Thoughts
A small cedar planter is a satisfying first outdoor build: a few simple cuts, careful predrilling, and a removable slatted bottom. Take your time checking actual lumber sizes and square, and treat the PDF as your dimensional reference.
Remember what this design is and is not. It is an educational plan for small removable nursery pots, and it has not been physically built or load-tested by Wood Project Lab.
This is an educational woodworking design that has not been physically built or load-tested by Wood Project Lab. Verify lumber dimensions, fastener suitability, and assembly fit before construction.
Related Projects
 BeginnerPlan available
Simple Wall Shelf
A 24-inch bracket shelf with a full materials list, bracket placement dimensions and a step-by-step installation sequence.
 BeginnerPlan available
Simple Wooden Phone Stand
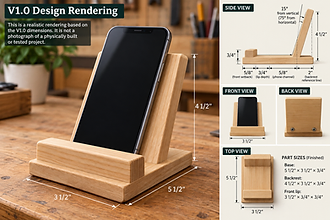
A dimensionally checked three-part plan with a full cut list, technical drawing and step-by-step instructions.

