DIY Wooden Coasters: Easy Scrap Wood Project
A matching set of four 4-inch square plywood coasters with a cut list, eight steps, finishing guidance and a free printable plan.
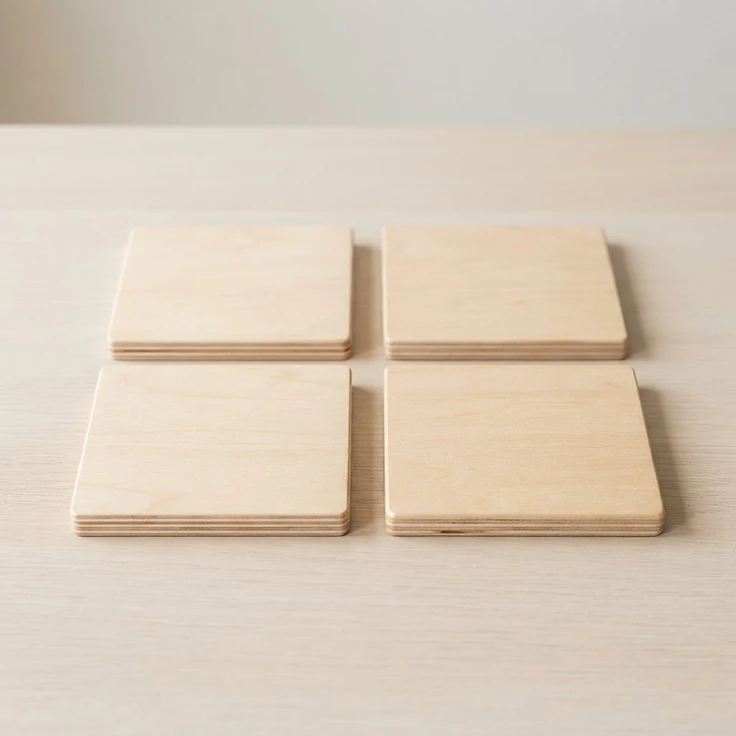
Design rendering of the V1.0 coaster set: four identical 4" × 4" × ¼" birch plywood squares. This is an illustration, not a photograph of a finished build.
On this page
Introduction
If you have a small piece of plywood and want a useful beginner woodworking project, DIY wooden coasters are an approachable place to start. This tutorial shows how to make a matching set of four square coasters with straight cuts, basic sanding, and a clear protective finish. You can also download the free dimensioned plans.
New to building? Browse our beginner woodworking projects or small woodworking projects first.
Project at a glance
Why make coasters from scrap wood?
Coasters are small, useful, and forgiving of simple tools. A 5" × 20" or larger piece of suitable ¼-inch plywood can provide enough room for four 4-inch squares with allowance for saw kerfs and trimming. Avoid damaged, warped, or delaminated scraps. A square design is easy to mark, and plywood reduces the risk of seasonal movement compared with thin solid-wood blanks.
Materials and tools
Materials: a flat ¼-inch birch plywood panel at least 5" × 20", sandpaper in approximately 120/180/220 grits, a clear finish labeled appropriate for the intended use, and optional self-adhesive cork or felt pads.
Tools: pencil, ruler, combination or try square, suitable fine-tooth saw, clamps or other secure workholding, sanding block, and finish applicator. Use suitable eye, hearing, and dust protection for the tools and products selected.
Wooden coaster cut list
Dimensions are finished sizes, not rough-cut stock sizes. A saw blade removes material (the kerf), so leave space between layout lines and cut outside the lines before trimming. Do not assume four 4-inch pieces fit into exactly 16 inches of stock.
| Part | Qty | Material | Finished size |
|---|---|---|---|
| Coaster blank | 4 | ¼ in birch plywood | 4 in × 4 in × ¼ in |
If measuring and marking is new to you, read how to measure and mark wood.
How to make wooden coasters: 8 steps
1. Inspect the plywood
Choose a flat, undamaged panel. Check both faces and all edges for voids or delamination.
2. Mark four squares
Measure and square up four 4" × 4" blanks. Include blade-kerf allowances in the layout.
3. Cut the blanks
Secure the workpiece and make straight cuts using a suitable saw. Keep hands clear of the cutting path and follow the tool instructions.
4. Check the fit and size
Measure each blank. Trim or sand to 4" × 4" and verify that corners are square.
5. Sand faces and edges
Start with approximately 120 grit as needed, then progress to 180 and 220 grit. Lightly ease sharp edges without changing the square shape.
Need a refresher on grits and technique? Read how to sand wood.
6. Remove dust
Vacuum or wipe away sanding dust according to the finish instructions.
7. Apply a protective finish
Finish the top, bottom, and exposed edges. Follow the manufacturer’s instructions for preparation, number of coats, ventilation, drying and full curing.
Choosing a finish? Read wood finishing basics.
8. Add pads if desired
Once the finish has fully cured, attach cork or felt pads near the underside corners, slightly inset so they are not visible from above.
Finishing tips for wooden drink coasters
For a coaster that will see cold drinks and condensation, finish selection matters more than decorative complexity. Choose a product whose label supports the expected moisture exposure, coat all six surfaces (top, bottom, and four edges), and let it fully cure before use. A finish does not make wood permanently waterproof. Wipe up spills promptly, and do not put wooden coasters in the dishwasher. Do not assume a finish is safe for direct contact with hot cookware.
Common mistakes to avoid
- Cutting four 4-inch squares from exactly 16 inches of stock without allowing for saw kerf.
- Using thin, warped, or delaminated plywood.
- Skipping square checks and ending up with mismatched coaster sizes.
- Over-rounding the edges and losing the clean square profile.
- Finishing only the top and leaving the underside and edges exposed to moisture.
- Using the coasters before the finish has fully cured.
- Treating a water-resistant finish as waterproof or heatproof.
Variations and personalization
After completing the basic four-coaster set, consider a different wood veneer, a carefully applied stain compatible with the topcoat, or decorative patterns. Any engraving, paint, or additional finish must be compatible with the selected clear coat. Keep the 4" square dimensions consistent if using the downloadable plan.
Free printable DIY wooden coaster plans
Download the Wood Project Lab DIY Wooden Coasters Master Construction Plans V1.0 PDF for the dimensioned square, cut list, tools, eight-step instructions, and finishing checklist.
Frequently asked questions
What wood is best for DIY wooden coasters?
This plan uses flat ¼-inch birch plywood. Its layered construction is convenient for thin, square pieces. Other woods require checking thickness, stability, and finishing needs.
Can I make wooden coasters from scrap wood?
Yes, if the scrap is sound, flat, and large enough for four finished 4" squares plus saw kerf and trimming allowance.
How big should wooden coasters be?
These plans specify 4" × 4" squares. Other sizes are possible but would be a different version of the plan.
Do I need screws or wood glue?
No. Each coaster is one solid piece of plywood; the base design requires no assembly fasteners.
How do I protect coasters from water rings?
Seal the faces and all edges with a finish labeled for the intended moisture exposure, allow full curing, and wipe up spills promptly.
Can these coasters go in the dishwasher?
No. Do not soak them or put them in a dishwasher.
Can kids make this project?
Young makers can help with measuring, sanding, and finishing tasks appropriate to their abilities, with adult supervision. Cutting tools and chemical finishes require adult judgment and the product-specific safety instructions.
Related projects and further learning
Explore the Wooden Serving Tray and Wooden Bookends, browse the full woodworking plans library, or see all small woodworking projects and beginner woodworking projects. For technique, read how to measure and mark wood, how to sand wood, wood finishing basics and woodworking safety basics.
Editorial accuracy and safety
This is a dimensionally specified design, not a documented physical build or performance test. No build time, project cost, water-resistance rating, heat tolerance or tested durability is claimed. Use proper workholding and follow tool and finish manufacturer instructions.
Related Projects
 BeginnerPlan available
Wooden Serving Tray
A handle-free pine and plywood tray, 16" × 10" × 2¼", with a five-piece cut list, ten-nail fastening schedule, seven steps and a free printable plan.
 BeginnerPlan available
Wooden Bookends
A matching pair of L-shaped pine bookends, 5½" × 6" × 6¾" each, with an inside cleat, a six-piece cut list, seven steps and a free printable plan.
 BeginnerPlan available
Wooden Storage Crate
An open-top pine and plywood slatted crate, 18" × 12" × 10", with a full cut list, seven assembly steps and a free printable plan.


